I have a confession to make: despite being an avid gardener, I am terrible at starting seeds. I have decent luck with seeds that go directly in the ground. However, anything that must be nurtured indoors for weeks before last frost is almost guaranteed to die. I have some theories about why this doesn’t work, one of them being that my house is often colder than the outside in the spring.
Maybe you are the opposite of me? Maybe you have all the luck in the world at starting seeds. Anyone I know who starts seeds has it down to a highly complex science—lights, humidifiers, thermometers, carefully scheduled simulated daylight and nighttime cycles . . . No wonder I can’t keep anything alive!
I recently met some kind folks who told me that they could solve my seed starting problems. They own some lovely rental cabins in Russell County (if you are ever in the area, book one of them, they are fantastic—Peaceful Valley Lake and Cabins). They hired me to put up a simple website for their business—but we connected over our shared love of gardening. I was skeptical when they said I could start seeds because of all my bad past experiences, but they invited me to come to their greenhouse and start seeds with them.
I fell immediately in love with their greenhouse. It was very simply constructed out of two by fours and plastic sheeting, just small enough for a person to stand up in. It’s a great size for a backyard gardener. (You are probably going to ask me just what size it is—but I didn’t think to measure until just now! Apologies!)

The very basic construction has me thinking that I could build this, although that may be overly optimistic since my constructions skills are limited to having once assembled a few bee hives!
The inside is made up of two beds which are lined with black plastic and filled with water. (They measured to make sure the float beds would match the size of their seed trays before building—definitely a good idea!)
![]()
I’ve been told that this is how folks used to start tobacco plants, back when tobacco farming was a major agricultural practice throughout Kentucky. The float trays, made of styrofoam, are very similar to tobacco trays. In fact, I’ve read online that many folks have gotten their float trays from retired tobacco farmers who just had them sitting up in a barn somewhere. Otherwise, it can be somewhat tough to find them—but check with your local farm store first. (FYI: I typically am a hater of styrofoam for environmental reasons, but you are limited in tray materials to what floats. Since these will be reused year after year, I guess that would justify my use of the material personally.)

These folks used a tobacco mix for potting up their trays. It is very, very fine in consistency, but I’m sure any commercial seed starting mix would work well. Seed starting is so easy—just put the seeds in the dirt. There was some debate about methodology here—some prefer to use a small screw driver to make the a hole to put the seed in. Others (like me) just used the finger method. Since they start so many seeds, it is one big party on seeding day with the entire family pitching in! I felt quite blessed to be a part of it.


Next, the full trays go in the float beds. They started everything in those trays—tomatoes, peppers, squash, watermelon (which they say doesn’t like to stay in the water after the initial soaking), cantaloupe, even carrots!
That’s it. Really. The easiest few hours of work I’ve ever done in my life for the greatest return. While they opt to add fertilizer to the water, I would use a natural alternative at home, such as compost tea probably. They open the greenhouse door and window on very hot days, but that is it. They do not fuss over these plants. No light timers, no heating pads, no humidifiers, no making checkmarks on clipboards . . . just the gift of patience (which admittedly is not always my strong suit).
About three and a half weeks later, they called me to tell me to come pick up my tomatoes. I was really excited when I got there and saw how lovely they were!

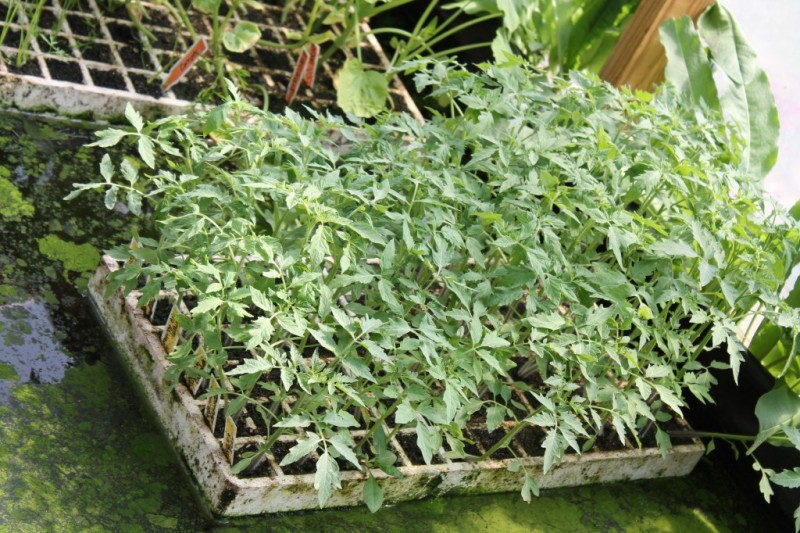
Since I started over 100 tomato plants, I didn’t have the time to plant them all in one day. I kept my plants looking amazingly healthy by floating them in my tiny ornamental fish pond until I could plant them! They seemed to really love it there. It is quite fascinating that so much plant can grow with very little soil. Here is what they looked like out of the tray—although this one had two plants since my five year old helped me put in the seeds!

I was told to expect some wilt when they went in the ground from transplant shock, but I kept them well watered and didn’t experience any. They are growing great and happy and I am looking forward to an abundant harvest of tomatoes this year!
My plan is to try to build something similar this fall for use in the spring. BUT I don’t think building a greenhouse would be necessary. There are so many different ways you could do a float bed. I was even thinking of a kiddie pool with some plastic on top. No matter what the container, I am completely sold on starting seeds this way!
{Please note: this is meant as an overview post rather than something exhaustive. Since I haven’t done this completely on my own yet, I don’t have all the details. Hopefully after I build my own, I will have some more detailed information for you. So . . . don’t deluge me with highly scientific questions—you pretty much have all of my knowledge now.}
Been using a float bed for several years to start lettuce, tomato, squash etc. Started in late Feb early March in Louisville area. You can get trays from a greenhouse supply in Carrolton KY with a variety of the number of cells. I use trays with 72 cells for garden plants. Tobacco trays are 288 +. My float bed is (4) 2X8’s on edge nailed together. lined with black plastic, filed with water. I use 3/4 inch PVC fashioned in an arch, spaced approx 3 feet apart to support the covering. This is covered with Row cover, or you can use plastic, but it may get too hot in the warmer weather. I have a light inside to generate a little heat for cool nights.
This method is just like the tobacco float beds used in this area. Plants pull out of the cells nicely and transplant well.
I am enjoying reading thru your blog tonight
When using the float system will the roots reach the water. And If so won’t the water be to much and damage the root. I saw a pic you posted showing one plant out of the styrofoam cell, it shows a long tap root. It had to be in the water looking at it’s size. I love this way of starting seedlings and bought a 3” v shaped cell tray. Made a container to hold water and placed the cell tray in it. I put growing soil in two cells to see if the soil will stay moist. This experiment is in a light box I built to contain heat and enable me to provide light. No greenhouse yet. Thanks for any input.
Hey Fred—Yes, the roots do reach the water, but they do not seem to be bothered by it. In fact, they seem to love it. I am NOT an expert by any stretch of the means, but that is simply my own experience. I left mine in water for many weeks after they should have been planted due to my busy schedule and they seemed unaffected by it, but only continued to grow happily despite having essentially no dirt. The folks who taught me this method did mention that watermelons didn’t like to stay in the water too long, but I found that mine were fine. (In fact, this was the first year I was ever able to produce watermelons!) They simply didn’t grow as fast in the water as they did when I finally got them in the ground.
Thanks for stopping by, Fred!
How early can you start seedlings in float trays? I live in Morgan Co., KY and want to build a High Tunnel for seed starting this year. Would it be better to “move” the water by creating a current to help it from stagnating? Also, would “Bubblers” be a good idea to add extra oxygen to the water? I got these ideas from researching some hydroponic and aquaponic plans I found online.
I think when to start the seeds is really up to you. I am sure you can follow any normal greenhouse schedule. With this mild winter, you might have been ale to start them in December! 🙂 The plants are in the water such a short time that I don’t believe stagnation is an issue, but you might try doing a test bed with bubblers and one without and see the difference!
Can you share your soil recipe? Thanks kindly!
Does damping off become a concern due to the wetness of the soil?
We had a late freeze one year and I had a bunch of tomato plants got wiped out. I didn’t have any heat at all in the float bed. I think if I had only had a light bulb on a timer to burn at night it would have saved them. That is what I am trying next.
HI!
Where can I find the float bed trays that have the larger holes like these? We have smaller ones that are used for tobacco, but need the larger ones….any ideas?
Thank you!!
I grew up on a tobacco farm and we used the waterbed technique, we used thick pieces of wood to create long rectangles and covered them in heavy duty black plastic and filled them with water, we would cover them in a white material that was arched using a pvc pipe. They would fill it full of water and float thousands of tobacco plants. The roots would strain to reach the water. The farmers would actually mow them down once they reached a certain height so that the stem would thicken up before taking them on the tobacco setter. I wouldn’t think mowing vegetables down would be necessary. It was so easy to do this, the concept of using this for a vegetable garden is a good one! And a kiddie pool would certainly do the trick! or draping heavy plastic over 2×4’s would work.
Where c an I buy new or used 72 or 128 cell stryofoam float trays. eastern ky can travel to get them looked online for the Carrolton Ky greenhouse online but tobacco ones said closed.
I too am looking for starter trays in and around Lexington Kentucky any help or suggestions really appreciated ,,,Thanks ,,,,Phil Meyers
859-319-5880 has 400 float trays 288 cell at Danville
859-805-0116 has 1500 tray as of last night FREE
I also want to buy the 72 cell float tray. Please let me know where to buy. thanks Randy